教程:使用iShowU HD Pro屏幕截图与Adobe Premiere Pro CC
来自ShinyWhiteBox的一款基于mac的屏幕监控应用iShowU.com, 是快速的, 易于使用的, and inexpensive; here's a look at how to use it to produce pro screencams that you can import into Adobe Premiere Pro CC to integrate into your video projects.
iShowU HD Pro是由ShinyWhiteBox创建的高品质屏幕捕获程序.com. 它速度快,界面易于使用,相对便宜(59美元).它与Mac OS X 10兼容.7. 在本教程中, 我将演示如何使用iShowU HD Pro创建屏幕截图, and then import it into Adobe Premiere Pro CC to mix with your existing video footage. The workflow I'll demonstrate has worked well for our studio in past projects, including the screencam-based教程 在我上一篇百家乐软件app最新版下载文章的开头.
I produced the example project for this tutorial using a MacBook Pro running OS X Mavericks and iShowU HD Pro v. 2.36.
一些初步建议
Here are four general tips to keep in mind before you start recording your iShowU screencam (or any other screen capture, 就此而言):
- 关闭不必要的应用程序
- 使用缓慢的鼠标移动
- 知道最终视频的尺寸
- 练习和准备.
在iShowU Pro HD中设置屏幕截图参数
图1(下面) 显示iShowU Pro HD UI,您将在启动应用程序时看到.

图1. 启动程序后显示的iShowU Pro HD UI. 单击图像以查看其全尺寸.
从左到右,让我们看看我们的选择. 我们将从Capture区域开始(图1中的左上角). Here you can choose the region of the screen to record via the Choose pull-down menu. 若要自定义,请选择“设置大小”以调出中所示的屏幕 下面的图2, where you can drag the edges of a bounding box to draw the area of the screen you want to capture.

图2. 自定义您想要捕获的屏幕区域. 单击图像以查看其全尺寸.
Alternatively, you can select one of the preset options available in the Choose pull-down (下面的图3)选择要捕获的屏幕部分. 对于这个例子, 我们知道我们的时间轴是1920x1080, so we'll choose Same as video size (1920 x 1080) as our screen capture recording size.

图3. 从“选择”下拉菜单中选择捕获区域大小.
The Output Video pull-down gives you a number of options for setting the parameters of your output video. 我们从第一个开始,Change size ()下面的图4). 对于这个项目, we want 1920x1080 to match the Premiere Pro project into which we'll be importing this screencam, 所以我选择与捕获大小相同.

图4. 选择与捕获大小匹配的输出大小.
接下来我们来看一下Change格式. 对于这个项目,对于更改格式,我们选择Apple ProRes422 (下面的图5). 如果您要捕获静止图像而不是视频,JPEG是一个不错的选择. 你可以继续用H.如果你想缩小你的文件大小, 但ProRes 422使我们能够保持最高的质量.

图5. 选择ProRes 422输出,以保持最高的质量.
最后,我们将帧率改为29.97 (下面的图6),因为这是我们将在我们的Premiere Pro项目中使用的帧率.
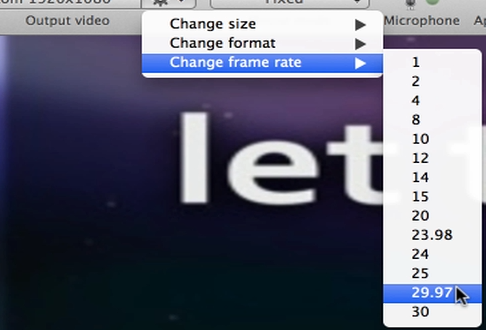
图6. 将帧率设置为29.97美元来匹配我们的Premiere Pro项目.
切换到鼠标模式,我们将选择默认的固定(下面的图7). 您可以在其他iShowU教程中探索其他选项.

图7. 选择固定鼠标模式.
For now we'll leave Microphone and Applications alone; we'll adjust these when we customize advanced settings.
就在鼠标模式的右边,你会发现键. Keys is a nice feature that iShowU HD Pro provides that allows you to show viewers the keys you're pressing when you're recording. 这对于教育视频或显示键盘快捷键非常有用. 向右移动, 我们暂时不开摄像头, but this is a setting you'll want to enable if you want to record yourself using a webcam during your screen capture.
转到媒体(下面的图8), 您可以在这里导入静止图像等媒体, 或者你系统上的任何东西都可以转换成iShowU HD来增强你的屏幕截图.

图8. 在选择媒体的情况下访问系统上的媒体资产. 单击图像以查看其全尺寸.
相关文章
在本教程中, 我们将看看如何与TechSmith Camtasia创建屏幕截图, and then import them into Adobe Premiere Pro to incorporate them into your existing Premiere Pro projects to create professional-quality instructional videos that seamlessly combine screencams and HD footage.
Here are three quick tips that will streamline your titling workflow in Premiere Pro when you create styles you like and want to use them consistently without reinventing them each time.
SpeedGrade的新speedlook, 面具跟踪在After Effects, 同步设置在Adobe媒体编码器, 改进的多镜头在Premiere Pro, 扩展的超高清/4k支持, 和更多的
Using Adobe Lightroom 5 to color-grade and apply metadata to DSLR video files is simple and efficient and can benefit live-switchers doing minimal edits, 编辑新手, 专业编辑探索非传统的工作流程.
Recent upgrades to Adobe CC make it easy to apply graded looks in Adobe Premiere Pro CC and match shots with different color temperatures via seamless roundtripping between Premiere Pro CC and SpeedGrade CC.
在最后一轮音频编辑冠军iZotope RX 3和Adobe Audition CC之间, 我们比较了两种音频编辑器的降噪和混响/回声减少.
在由两部分组成的系列文章的第一部分中, Jan Ozer compares the declipping and crackle and pop-removal features in iZotope's new RX 3 pro audio editor to the parallel features in Adobe Audition CC.
探索3个新的关键功能在试听CC, the newest version of Adobe's professional audio editing application: Sound Removal for eliminating hums and other variable-frequency unwanted noises, 响度雷达仪表,用于匹配和坚持广播音量标准, 和自动语音对齐ADR.
如果你发现自己不得不从Premiere Pro渲染多个序列, 有一种比使用Premiere Pro Export控件更简单的方法. This tutorial will explain the easier 和更多的 efficient way using Adobe Media Encoder.
Here's a quick tutorial for Premiere Pro CC users on how to migrate encoding presets that you created to customize and streamline encodes in Adobe Media Encoder CS5/6 into Adobe Media Encoder CC so you can pick up right where you left off.
在本教程中 you'll learn how to create and edit industry-standard closed captions for video using the new closed-captioning capabilities in the just-released Adobe Premiere Pro CC.
Two types of noises degrade the audio you shoot with your video: random noises like microphone clicks and pops, 以及持续的噪音,比如白噪音或空调嗡嗡声. 本教程演示如何在Adobe Audition CS6中删除它们.